Friday, March 26, 2010

Toilet Paper Card

I know, toilet paper card,  sounds weird huh?? LOL, well, I have made a mini scrap book using this idea, but I wanted to make a card  instead. Here are a few photos of the mini scrap book. 
This is the front of the mini album
   
                                          
Three "toilet paper rolls"LOL

Then the pictures. If you all like this it is the same exact idea as the card, you just punch holes on the ends and add the brads and rings. Pretty cute. I had photos on both sides. I made this for my Mother-n-Law :)
Ok, enough about that and onto the card.

Just use an empty roll of toilet paper:) 

Now using your scoring tool or the dull side of a butter knife. Flatten out the roll.

Now cut a peice of card stock 6 3/4 inches long by 4 1/4 inches wide. Score at 1 1/2 inches and 4 1/4 inches. You are going to tape this cardstock to the TP roll. 

Now tape it really well, especially the edges:)

I did not tape it well enough, so I used a peice of sticky strip to seal it closed. Now the TP roll is completely covered in the blue cardstock.


This is what your TP roll should look like. 

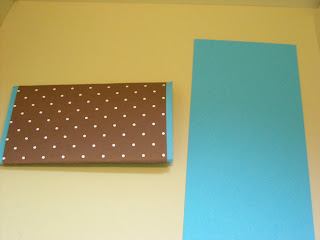
Ok, then I cut a peice of double sided pattern paper 4 inches wide by 11. I then wrapped it around the teal colored cardstock. I did not score it, I just wrapped it. I tried to scor the first one and it ripped, it is just not strong enough, but I like the look of it wrapped:)

Then just cut off what you are not using.

And againk, using sticky tape, I sealed the edge.


I cut a strip of teal 3" wide by 11 long. 

Tape the edge of the teal (you did this with the pattern paper, but I did not take pictures, same idea though)

Tape it on where you want it and then wrap it around the roll.

When you get to the end, tape it real well.

cut off the excess and it is complete

I used the Cheep talk set from Stampin' Up and some gems for the center of the flowers. I also used glossy accents to adhear the flowers. 

I used some Copics to make the grass, nothing special about 4 different greens and just made swooshy lines!

Ok, now for the inside. I used a peice of chipboard, (the back of a cereal box) And I cut it to 3 3/4 long by 2 1/4 wide. Yes I made a mistake in the photo, but it is 3 3/4 long:) Then you will cut two peices of pattern paper  (the opposite side that you used on the front). Cut them both 3 3/4 long by 2 1/4 wide.

Tape the chip board well and adhere the pattern paper, one peice per side.

It should look like this when you are done.

I cut two teal peices of card stock at 2 inches wide by 3 3/4 inches long
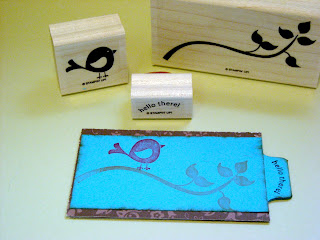
I also punched out a label

I distressed the sides using the Distress Ink and my dabber:)


I added adhesive to the inner part of the label then lined it up on the chipboard stuck it down and sealed the other side as well. 

This is what it should look like. The paper gets adhered over the label so it looks like a tab. 

I stamped it using gingerbread chaulk ink and some colorbox red ink.The hello there is in black 

I used my copic and colored in the leaves. I also used stickles clear on the wings and for the eye.

That is it!! You have a recycled card:) Enjoy!


Thursday, March 25, 2010

Distressed Card

Good morning! As you can see I am making a huge effort in posting something everyday or at least 3-4 times a week. Today I am showing you how I use my Copic markers. I LOVE THEM!!!! They just blend so well!

Ok, so I used a stamp I got on clearance at Hobby Lobby in Cleveland. I choose it specifically so I could use my markers:) When using Copic markers, I use Stazon so it does not run. I then seal it with a hair dryer to help. I have heard that you can use Memento Ink but I still have to try it!! It is on my list of things to try. 

These are the colors I have choosen for the hair. I have no rhyme or reason for choosing colors, I just pick a light color, this is the one you will use the most, but it will not be the color of the hair. Then I choose one or two other colors that are darker to shade. 

I colored her hair in with the lightest color, and I did not cover every little space. It adds more dimension when you are "sloppy" coloring.

Then I took the next darkest color and just colored around the edges and a little bit in where eventually I want it darker, like the ends.

Then I go over it again with the lightest color to blend it in.

I then add the third darker color using the same technique, adding color to the places I want dark.

Then I went over it again with the lightest color. So do you get the idea? Always start with the lightest color and after every color you add you go over it again with your lightest color. It blends perfect:)

These are the colors I used for the wings. I tried to keep the colors "distressed". 

These were the colors I used for the apron.

These were the colors for the for the star. I forgot to show the colors for the dress. Sorry. But you get the general idea. 


This color, C1 is invaluable!! I love it for shading. I even use it when I use my prisma colors. It is truly awesome. I went around the whole image, but went lighter on the left side and heavier on the right. I always try to think of where the sun is going. So technically the whole image would not have a big shadow, one side will always be heavier than the other. 

You can notice it a little more in this photo

These are my favorite inks by Ranger they can be found quite easily at Michaels. I use coupons for them and I get them quite cheap. I also got the tool you see here, it is AMAZING!! No more dirty fingers:)

Ok, so I start with the lighter color, again, it is all about the layering of colors. I started with Antique Linen and go in a circular motion and just keep going over it and it blends wonderfully. I go in quite a bit with the lighter color and the darker color I will keep closer to the edge. 

This is what it looks like after both distress colors have been added. 

This is what it looks like on my card. I love it!!! What do you think?? I always make the envelope to match, even if it is a little something from the card and put it on the envelope. 

Wednesday, March 24, 2010

Easter Treats

Hello! I am back. So I have been debating for some time now about wether I should be a Stampin' Up Demonstrator or not. One minute I am all for it, and in the next minute I am unsure. I love ALL stamps, and that is my problem. When you are a demonstrator, you are held to use only Stampin' Up products. Hmmm......the debate continues. In the mean time, I am using my husband's camera, the quality of the photos is not up to par, but I think it will work until I can come up with money to purchase a camera.
So here it goes! Enjoy!

Here are the supplies. Two tag punches, one large, one small, I used Stampin' Up's large tag punch and small tag punch. I found these really cute white buckets at the dollar store, super cute! Green grass for the basket, tule, Easter stamp, Glossy Accents and a Easter type candy.

I also used some shiney raffia and a butterfly punch. A small one.

I used some pinchers here and squeezed the bucket handles together so they would stay up. 

It will look like the one on the right. Do this to both sides.

Next, take the glossy accents, (it is a super great adhesive) apply a tiny dot wherever you want a butterfly.

Add a butterfly leaving the wings up a little to give that 3D effect.

Stuff the bottom of the pail with a little bit of papertowel. This will help the eggs stay on top.

Add in grass.

Now the eggs or candy of your choice.

It is hard to see, but place two strips of tule down, I started doing it like a T shape, but quickly found that it does not work! So put them side by side overlapping about an inch or so. Gather up and tie with raffia.

Now we will make the tag. Punch a large tag and a small tag.

Stamp the small tag however you wish. I got this trio stamp set at JoAnn fabric in the dollar bin:)

Using double sided tape, tape the smaller tag to the larger tag.

Punch hole where you want the brad to go.

It should look similar to this.

Add the tag to the already tied raffia. Tada!! You are done. The whole project cost me around $.75 to make! Let me know what you think!


Thursday, February 4, 2010

I have not disappeared!

Ok, so you are wondering where I have been? Well, my camera is out of commission, so.....
no tutorials! UGGH!! I am hoping Uncle Sam is going to be good to me!
Please keep checking in, I will be back up and running in no time.